Pages

Wednesday, July 10, 2013

Let's Get Trendy Now!3 Challenge winners!

Hello there! Ready to check out our winning entries...

Day 1: Neon


Day 2: Sequins


Day 3: Handmade embellishment


Day 4: Stitching


Day 5: Textured layers


The Grand Prize Winner is Melissa Bonaficio


Melissa's Neon layout


Melissa's sequin layout


Melissa's handmade embellishment layout


Melissa's stitching layout


Melissa textured layers layout


The sign-up RAK winner is....

Denise van Deventer!

Winners, please email your mailing details so we can get your RAKs sent out to you! Thank you so much for participating in Let's Get Trendy Now!3. :)


Friday, June 7, 2013

Let's Get Trendy Now!3 - Day 5: Textured layers

Have you been eyeing those luscious textured layers on the projects of your fave artists? Want to know how to create the "illusion" of textures on your card so that it still ships on normal postage? *winks* We've saved the best for last. Let's look at how we can create textured layers on our projects. :)


1. Layering patterned papers.

Designer Ashley Horton creates yummy textures on her tag through a mix of different patterned papers.

For more details on this tag and a complete supply list, please visit Ashley Horton Designs. Psst....she's offering some free nautical printables...


2. Create textures with common household supplies.

Designer Erum Tasneem created the fabulous textures on her card with home-made mixed media supplies.[Read her tip.]


For more details on this card and a complete supply list, please visit VIBGYOR Krafts.


3. Create the illusion of layers.

Like the look of textured layers but prefer less lumpy pages? Designer Miae Rowe used gesso, masks and colorants to create a vibrant textured layout that still fits into your page protector.


For more details on this layout and a complete supply list, please visit Making Scrap Up.


4. Get creative with pretty supplies.

Designer Helen Tilbury created her textured masterpiece using 2 pieces of patterned papers,a layer of lace bling, misted muslin, flowers, trinkets and glitter.


For more details on this altered bubble bath bottle and a complete supply list, please visit Scrap Addict.


5.Choose patterned papers that have textured designs.

The glasscloth paper on designer Amy Tsuruta's upcycled coffee sleeve provides faux-texture.
 
For more details on this altered project and a complete supply list, please visit Tsuruta Designs.


6. Play with fabrics.

Mixing up fabrics can create incredible textures as seen on designer Julie Tucker-Wolek's layout.
For more details on this layout and a complete supply list, please visit The Tucker and Wolek Clan.
7.A combination of different textural materials.


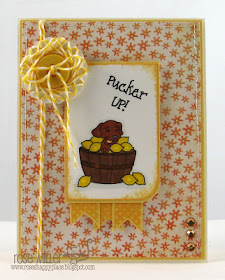
Put it all together with a fun combo of paper, fabric, plastic and metal like on designer Yvonne Yam's card.


For more details on this card, please visit Do More With Less.


There you have it. 7 glorious ways to create yummy textured layers on your projects. And awesome tips from the designers. Confident to give textured layers a go? We want to see your TEXTURED LAYERS projects. Please link your newly created textured layered projects via Inlinkz [located at the end of the post] by June 30 11.55am EST for your chance to win these fabulous self-adhesive embellishments sponsored by ZVA Creative.  Please read rules of play to ensure eligibility for our prizes.


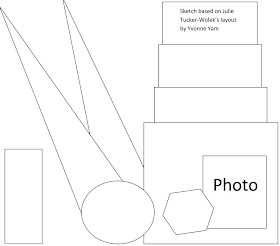
Here is today's sketch. :)


But wait! We are not quite done yet. Play along with all 5 trend challenges for your chance at the grand prize. Will you be one of the contenders? If you've played along with all 5 challenges, please add your name  and email address via Inlinkz [located at the end of the post] by June 30 11.55am ESTPlease read rules of play to ensure eligibility for our prizes.


So we've come to the end of our 5 day trend workshop. Have you had fun? Have you been inspired? Do you think we should have a Let's Get Trendy Now!4 ? If you like what you see, come follow us at our personal blogs [link list on the sidebar]. 

This is your host Yvonne Yam signing off for now. Come back to this blog on July 10 at 12am EST when we showcase an inspiration parade of your challenge creations and announce all our winners! See you on July 1o!

P/s: Can't wait till July 10? Come join us at the Let's Get Trendy Now!3 Facebook Page where you can pose any questions you have on the trends we've covered.


Thursday, June 6, 2013

Let's Get Trendy Now!3 - Day 4: Stitching

Whether it is decorative stitching to complement a creative project OR practical stitching to secure elements together OR faux stitching for the lazy ones among us *High fives all around* via a pen, rub-ons, stickers, stamps or pre-stitched elements, we love the "finished" look stitching gives. So how can we incorporate stitching on our projects? 


1. Approach it like you are doodling.


Stitching can add such a fun whimsical feel to your page like designer Jinny Newlin's layout. Her stitched circles seem to suggest the trajectory of the school bus and help to guide the eye around the layout.


For more details on this layout and a complete supply list, please visit Soaring.


2. Give your sentiment some special treatment.

Designer Lauren Bergold ups the ante on her card by adding a stylized and hand embroidered sentiment. 

For more details on this card  and a complete supply list, please visit All the good blog names were taken. Lauren also has a step-by-step tutorial on how to custom stitch your sentiment.

3. Try stitching on unconventional materials.

Designer Shahrul Niza handstitched a foldable fabric notebook along with a matching plastic pocket holder for the sweetest love note ever.


For more details on this beautiful project, please visit Such Pretty Canvas. Shahrul has a step-by-step tutorial on how she created this project.

4. Use stitching to replace twine or ribbon.

Not only is this functional, the ends of the thread provide texture and movement like on this darling card by designer Amy Tsuruta.
For more details on this card and a complete supply list, please visit Tsuruta Designs.


5. Use stitching to secure unusual elements and create texture.

Not sure if glue will hold up to the rigours of time, then stitching is a great way to ensure that your elements stay in place as seen on designer Julie Tucker-Wolek's layout.


For more details on this layout and a complete supply list, please visit The Tucker and Wolek Clan.

6. Stitching can serve as a border or mat.

Designer Yvonne Yam stitched around her photo to create texture and interest.


For more details on this altered project and a complete supply list, please visit Do More With Less.


There you have it. 6 ways of incorporating the stitching trend on your projects. And some valuable tips! All geared up to tackle your sewing machine OR cheat a little with those rub-ons? You know that we want to see your STITCHING projects. Please link your newly created stitching projects via Inlinkz [located at the end of the post] by June 30 11.59am EST for your chance to win this fabulous stamp set sponsored by Freshly Squeezed Stamps.  Please read rules of play to ensure eligibility for our prizes.


Here are today's sketches. :)

Can you believe we are at Day 4? Just one more day of awesome inspiration left. 
Thank you for your support ....we love reading your comments about how you've been inspired. And retailers need to pay us some commission too...*winks* lots of people went shopping for new supplies..*LOL*

See you tomorrow for Day 5: Textured layers


Wednesday, June 5, 2013

Let's Get Trendy Now!3 - Day 3: Handmade embellishments


Sick of the cookie-cutter embellishments that coordinate perfectly with your papers  but are just too...vanilla? Why not make your own handmade embellishments? Haven't a clue where to start? Read on....


1. Look to your kitchen for some yummy supplies.

Designer Kirsty Vittetoe created her pretty bloom from a cupcake liner. Your kitchen probably has a lot more yummy supplies to offer. That you haven't discovered. Yet. *winks*

For more details on this card and a complete supply list, please visit Handmade Little Things.


2. Use your mixed media supplies.

Get creative with your existing mixed media supplies and create dimensional handmade embellishments that coordinate perfectly with your project like designer Keren Tamir

For more details on this altered project and a complete supply list, please visit Expressing from my heart and soul.


3. Think fabric.

Fabric is a cool way to create unique handmade embellishments like the fun handcut elements designer Chantal Vandenberg made for her cute layout.


For more details on this layout and a complete supply list, please visit Girls just wanna scrapbook.

4. Go with supplies you have plenty of.

Get creative with paper, punches and ribbon like designer Amy Tsuruta did with her frame....she created a layered paper embellishment and ribbon bloom for her frame! 

For more details on this altered project and a complete supply list, please visit Tsuruta Designs.

5. Use your patterned papers.

Taking the time to fussy-cut the elements from patterned paper can be rewarding as seen in this layout by designer Julie Tucker-Wolek. Her fussy-cut elements add great interest and dimension to her page.


For more details on this layout and a complete supply list, please visit The Tucker and Wolek Clan.

6. Make use of found stuff.

An old bottle cap can be jazzed up with some sequins and bling to create a one-of-a-kind embellishment on designer Yvonne Yam's tag.


For more details on this tag and a complete supply list, please visit Do More With Less.


There you have it. 6 awesome ideas for creating your unique handmade embellishments. And some useful tips. Can't wait to get started on those handmade embellishments? We would love to see your take on HANDMADE EMBELLISHMENTS. Please link your newly created handmade embellishment projects via Inlinkz [located at the end of the post] by June 30 11.59am EST for your chance to win this 12x12  Indian Summer Paper Pack sponsored by GCD Studios.  Please read rules of play to ensure eligibility for our prizes.


Here are today's sketches.

Please leave a little love for our designers. :) And a big thank you to those who have already linked up to our challenges!

See you tomorrow for Day 4: Stitching.